
Cedar shingles are a popular, sustainable roofing material known for their natural beauty and durability. This guide provides a comprehensive step-by-step approach to installing cedar shingles successfully.
1.1 Benefits of Cedar Shingles
Cedar shingles offer numerous advantages, making them a popular choice for roofing and siding. Their natural beauty and unique texture enhance curb appeal, while their durability ensures long-lasting performance. Cedar shingles are resistant to insects and decay, reducing maintenance needs. They also provide excellent insulation, helping to regulate home temperatures. Additionally, cedar shingles are sustainable and eco-friendly, as they are made from renewable resources. Properly installed, they can withstand harsh weather conditions and last for decades. Their versatility allows for various installation styles, making them suitable for different architectural designs. Overall, cedar shingles combine aesthetic appeal, durability, and environmental benefits, making them a smart investment for homeowners.
1.2 Importance of Proper Installation
Proper installation of cedar shingles is crucial for ensuring their durability and performance. Improper techniques can lead to premature wear, leaks, and structural damage. A well-installed cedar roof provides a watertight seal, protects against weathering, and maintains the integrity of the structure. It also enhances the aesthetic appeal and prolongs the lifespan of the shingles. Proper installation involves preparing the roof deck, applying the correct underlayment, and securing shingles with appropriate fasteners. Following best practices ensures safety, prevents costly repairs, and maintains the warranty of the materials. Professional installation or adherence to detailed guides is highly recommended to achieve optimal results and enjoy the full benefits of cedar shingles.
Preparation for Cedar Shingle Installation
Preparing for cedar shingle installation involves assessing the roof deck, calculating materials needed, and gathering essential tools and equipment to ensure a smooth process.

2.1 Assessing the Roof Deck
Before installing cedar shingles, the roof deck must be thoroughly assessed to ensure it is clean, dry, and in good condition. Inspect for any damaged, rotten, or weak spots and repair them immediately. A sturdy, even surface is crucial for proper shingle placement and long-term performance. Remove any debris or old roofing materials to create a clean base. Additionally, check for adequate ventilation to prevent moisture buildup, which can compromise the integrity of the cedar shingles. Once the deck is prepared, install a waterproof membrane or felt underlayment to protect against moisture infiltration. This step ensures a solid foundation for your cedar shingle installation.

2.2 Calculating Materials Needed
Accurately calculating materials is essential for a successful cedar shingle installation. Determine the total area of the roof in square feet and order shingles based on this measurement. Cedar shingles are typically sold by the square, with one square covering 100 square feet. Add 10-20% to your total to account for waste and cuts. Include additional materials like fasteners, underlayment, and ridge caps in your calculations. Ensure you have enough nails or staples, as they are critical for securing the shingles. Finally, verify the availability of materials with your supplier before starting the project to avoid delays. Proper planning ensures a smooth and efficient installation process.
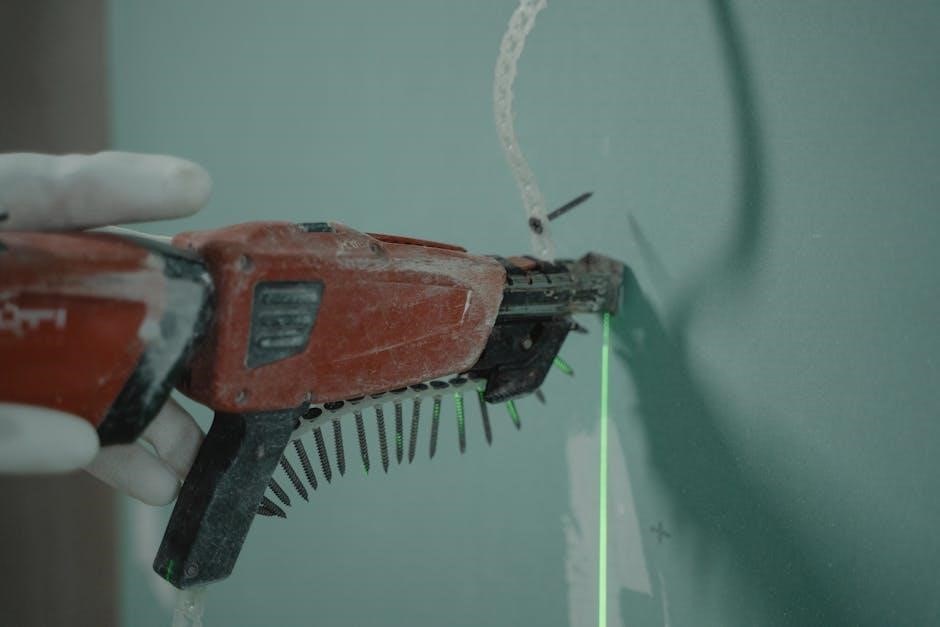
2.3 Essential Tools and Equipment
Installing cedar shingles requires specific tools to ensure a professional finish. A tape measure and chalk line are necessary for marking straight lines and aligning shingles. A utility knife or saw is needed for cutting shingles to fit around vents, edges, or irregular shapes. A staple gun or nail gun is essential for securing shingles to the roof deck. Roofing nails or staples are recommended for durability. A hammer is useful for tapping shingles into place. A pry bar can help remove old shingles if replacing an existing roof. Safety gear, such as a harness and sturdy ladder, is crucial for working at heights. Gather all tools beforehand to streamline the installation process and ensure efficiency.
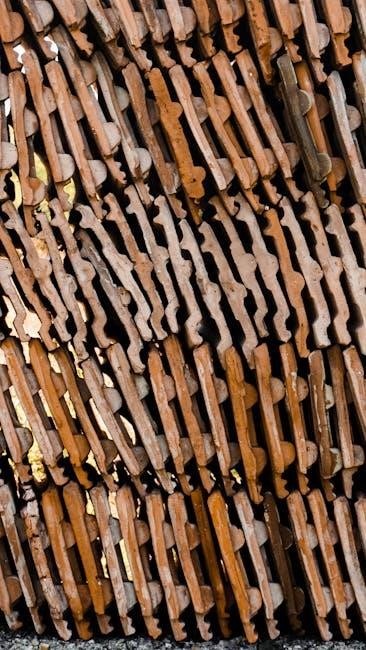
Installing Cedar Shingles
Cedar shingles are installed in overlapping courses, starting with a double-layered starter course. Each subsequent course is secured with nails or staples, ensuring proper alignment and spacing.
3.1 Laying the Starter Course
The starter course is the foundation of a cedar shingle roof, ensuring proper alignment and water protection. Begin by installing two layers of shingles along the roof’s edge. The first layer should cover the top of the foundation by about an inch, while the second layer extends further, creating a double barrier against moisture. Secure these shingles with nails or staples, making sure they are tightly fitted. This double-layered starter course prevents water infiltration and provides a stable base for subsequent courses. Proper installation of the starter course is crucial for the longevity and performance of the roof.
3.2 Applying Shingles in Courses
After laying the starter course, begin applying shingles in overlapping courses, starting each course directly above a joint from the course below. Maintain a consistent exposure of about 5 inches, ensuring each shingle aligns properly with the one beneath it. Use a chalk line to guide straight alignment and spacing. Leave a 5mm gap between shingles to allow for thermal expansion. Cut shingles as needed using a saw or utility knife, and stagger joints between courses for a seamless appearance. This method ensures even coverage, prevents water infiltration, and maintains the roof’s structural integrity. Properly aligning and spacing shingles is key to achieving a durable and visually appealing roof.
3.3 Securing Shingles with Fasteners

To ensure a secure and durable installation, fasten each shingle with two galvanized or stainless steel nails or staples. Place fasteners about 1 inch from the top and 1 inch from each side of the shingle, ensuring they pass through the thickest part of the wood to prevent splitting. For double-layered areas, such as valleys or ridges, use additional fasteners for extra stability. Maintain consistent spacing between fasteners to keep shingles flat and prevent buckling. Avoid over-tightening, as this can damage the shingles. Properly securing shingles is critical to withstand weather conditions and ensure a watertight seal. Follow manufacturer guidelines for fastener type and placement to guarantee optimal results.

Finishing Touches
Complete the installation by adding ridge caps and sealing gaps between shingles. Use weather-resistant materials to protect joints and ensure a watertight seal. Install decorative trim for a polished look.
4.1 Installing Ridge Caps
Ridge caps are essential for completing the roof’s peak, ensuring weather-tightness and aesthetic appeal. Cut the caps to fit the ridge length, overlapping each joint by at least 2 inches. Secure them using durable fasteners, spacing them evenly to prevent shifting. Use materials like pre-bent metal or matching cedar shingles for a seamless look. Proper installation prevents leaks and enhances the roof’s durability. Ensure the caps are aligned and securely fastened to withstand harsh weather conditions. This step finalizes the roof’s appearance while providing long-term protection.
4.2 Sealing Gaps and Joints
Sealing gaps and joints is crucial to ensure a watertight and durable cedar shingle roof. Use a high-quality waterproof sealant to fill any gaps between shingles, valleys, and vents. Apply the sealant carefully along the edges and joints, ensuring complete coverage without over-application. Silicone or polyurethane-based sealants are recommended for their flexibility and weather resistance. Allow the sealant to cure fully before exposing the roof to moisture. Regularly inspect and reseal gaps as needed, especially after harsh weather conditions. Proper sealing prevents water infiltration and extends the lifespan of your cedar shingle roof. This step ensures long-term protection and maintains the roof’s integrity.
Maintenance and Care
Regular cleaning and inspections are essential to maintain cedar shingles. Remove debris, inspect for damage, and apply protective treatments to preserve their durability and appearance.
5.1 Cleaning and Debris Removal
Regular cleaning is crucial to maintain the integrity of cedar shingles. Use a stiff broom or wire brush to remove leaves, branches, and other debris that may accumulate. Avoid using pressure washers, as they can damage the wood. Moss and mildew growth should be addressed promptly to prevent rot. For stubborn stains, a mild detergent mixed with water can be applied, but always rinse thoroughly. Cleaning should be done annually or after severe weather conditions to ensure the shingles remain in optimal condition. Regular debris removal prevents water pooling and promotes airflow, extending the lifespan of your cedar shingle roof.
5.2 Inspecting for Damage
Regular inspections are essential to identify and address damage to cedar shingles. Look for signs of rot, splits, or cupping, which can weaken the structure. Check for insect damage or mold growth, as these can compromise the shingles’ integrity. Ensure all fasteners are secure and shingles are properly aligned. Inspect the roof after severe weather for missing or loose shingles. Addressing damage early prevents costly repairs and extends the lifespan of your roof. Regular inspections also help maintain the aesthetic appeal of your cedar shingle installation, ensuring it remains durable and visually appealing for years to come.
5.3 Protective Treatments
Applying protective treatments is crucial for maintaining the longevity and appearance of cedar shingles. Water-repellent sealants and UV protectants help prevent warping and fading caused by weather exposure. Insecticides can be applied to deter pests that may damage the wood. Regular treatments also help resist mold and mildew growth, especially in humid climates. It’s important to use products specifically designed for cedar to avoid damaging the natural wood. Treatments should be applied according to the manufacturer’s instructions, typically every few years, to ensure optimal protection. This proactive approach helps preserve the structural integrity and aesthetic appeal of your cedar shingles, ensuring they remain durable for years to come.
Best Practices and Troubleshooting

Cedar shingle installation requires precise alignment and consistent spacing. Avoid overexposure to weather and use high-quality materials. Regular inspections help identify and address issues early.
6.1 Tips for Successful Installation
Proper planning and execution are key to a successful cedar shingle installation. Ensure the roof deck is clean, dry, and in excellent condition before starting. Measure accurately to avoid material waste and use high-quality fasteners to secure shingles. Maintain consistent spacing between shingles, typically 5mm, to allow for thermal expansion. Apply a double starter course at the base for stability. When reaching the ridge, use pre-formed caps for a seamless finish. Regularly inspect and address any gaps or loose shingles during installation. Using the right tools, like a shingle rack, can streamline the process and ensure precision.
6.2 Common Mistakes to Avoid
When installing cedar shingles, several common mistakes can compromise the integrity and appearance of the roof. One major error is failing to ensure the roof deck is clean, dry, and structurally sound before installation. Improperly aligned or spaced shingles can lead to uneven wear and water infiltration. Using the wrong type or size of fasteners is another oversight, as it may cause shingles to loosen or split. Additionally, not leaving adequate space between shingles for thermal expansion can result in warping or cracking. Neglecting to seal gaps around vents or chimneys invites leaks and damage. Lastly, ignoring manufacturer guidelines for materials and tools can lead to subpar results and void warranties. Avoiding these pitfalls ensures a durable and attractive cedar shingle roof.